|
Build your own Pop Bottle Magnetometer |

|

|
|
Wednesday, 31 October 2007 |
|
The 'Pop Bottle Magnetometer' is a very simple piece of equipment. It measures changes of the magnetic field at the Earth's surface, which occur due to 'Geomagnetic Storms' or other 'space weather'. A 'pop bottle' magnetometer works just as well using a glass jar.
Materials - a clear (and clean!) plastic 2-litre pop bottle with its label removed and a plastic lid.
- thread
- a bar magnet shorter than the width of the bottle
- a small craft mirror, mirrored sequin or piece of mirror-card
- a piece of card
- sand or rice to stop the bottle falling over
- blu-tac
- a drinking straw or copper wire
- sticky tape, scissors and glue
Method 
| 1. Carefully cut around the pop bottle to remove the top 1/3. 2. Fill approximately the bottom 1/3 of the bottle with sand or rice. 3. You need to make something to suspend the magnet by. This can be done in one of two ways, EITHER using the drinking straw OR using the copper wire: | 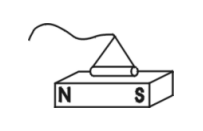 | Drinking straw- Cut the straw slightly shorter than the magnet and stick it to the magnet using glue or sticky tape.
- Cut a 50cm length of thread and thread this through the straw.
- Make a triangular loop of this thread, keeping the long piece of thread attached to this triangle.
| 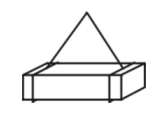 | OR Copper wire
- Cut a 20cm length of fairly strong copper wire.
- Wrap the ends of the copper wire around the ends of the magnet and pull the wire in the middle to form a triangle.
- Cut a 30cm length of thread and attach this to the point of the triangle.
| 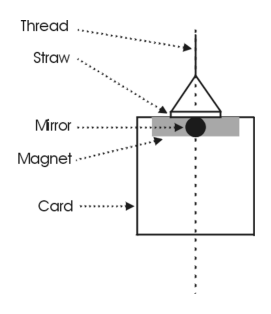 |
4. Cut a rectangular piece of card. It must be able to move freely within the bottle when hanging vertically. Use glue to stick the magnet to the middle of the top edge of this. 5. Stick the mirror to the middle of the other side of the magnet. Make sure this is in line with the thread from which the magnet is hanging. 6. It is important to make sure that the magnet hangs horizontally. If the magnet isn't quite horizontal stick a small piece of blu-tac to the cardboard to rebalance it. | 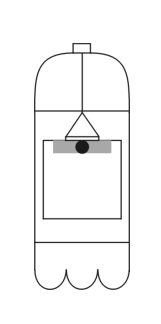 |
7. Make a small hole in the centre of the bottle top and screw the top back on. 8. Feed the thread through the hole and adjust the length of the thread so that it does not scrape on the sand. Also, the mirror should be at least 2cm below the cut edge of the bottle. Secure the thread to the top of the bottle to stop it slipping. Use sticky tape or glue, or tie the thread to a matchstick laying across the hole. 9. Tape the top of the bottle to the bottom. |
Now you have your magnetometer, ready to use! |
|
Last Updated ( Tuesday, 16 June 2009 )
|




 Aurora Watch Website. Version 1.0.