Sun 12 Jan 2025 06:05 MST
Home arrow DIY Magnetometers arrow How to use your Pop Bottle Magnetometer

Edmonton Weather

Light Snowshower
Observed at: Edmonton Int'l Airport 6:00 AM MST Sunday 12 January 2025
Condition: Light Snowshower
Temperature: -3.5°C
Pressure: 102.4 kPa falling
Visibility: 13 km
Humidity: 100 %
Wind Chill: -6
Dewpoint: -3.5°C
Wind: SSE 7 km/h
Air Quality Health Index: 3
]]> Courtesy of Environment Canada

Calling Radio Hams...

radio tower
Are you an amateur radio operator? Do you want to use the Aurora to boost your range? Meet a like minded person, right here...

Syndication

feed image
feed image

Email Alerts!

Email alert
Receive AuroraWatch Alerts straight to your email account!

Already signed up? Manage your account

Athabasca U. All Sky Image (BETA)

Athabasca U. ASI

Live (after dark) all sky image from Athabasca University. Click the image to visit their site for more information.

AuroraWatch widget for your website

Get AuroraWatch on YOUR webpage!
Would you like to have Aurora predications right on your website for FREE!? Try our AuroraWatch widget..

Quote_Hanske.png
How to use your Pop Bottle Magnetometer Print E-mail
Thursday, 01 November 2007
Your pop-bottle magnetometer can be used to monitor variations of the Earth's magnetic field, some of which may occur due to 'Geomagnetic Storms'. By taking measurements with your pop-bottle magnetometer you can observe such 'Space Weather' yourself.

Equipment

Pop-bottle magnetometer, lamp with non-frosted bulb, scale (a letter sized sheet of paper with a 30cm ruler photocopied onto it), meter rule, logbook.

Setting up the Equipment


1. Find a clear area that is as far from power lines, electrical equipment and large metal objects as possible.

2. Set up your equipment as shown in the diagrams. The light will reflect off the mirror and onto the scale, which should be stuck to a wall or sturdy box. The distance between the mirror and the scale should be between 1 and 2m - take a note of this distance. The distance between the lamp and the mirror doesn't matter too much, although 50cm works well. We found that a good reflection is produced if the angle between the lamp and the mirror is between 10 and 20°. You need to be able to see the spot of reflected light on the scale clearly enough to be able to record its position to the nearest 0.5cm. It may take a little trial and error to get this right and its a good idea to do this in a dimly lit room so the light spot can be 'found' easily.
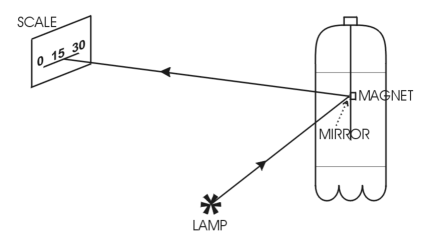
Pop bottle detector arrangement

3. Make sure that the light spot moves horizontally across the scale and that the scale is level with this movement. When the spot settles in one position move tha scale so that the spot falls on the '15cm' mark. This is the 'null' position.

4. Now you have set up your experiment it must not be moved. If possible use masking tape to secure them to the surface. If any of the components are moved at all during the experiment, start again by repositioning the reflected light beam on the 15cm mark, and note this down in your logbook.

 Taking Measurements

  • As well as making sure that the experimental set-up is not disturbed, you must make sure that any large metal objects near to the experiment are not moved about. These will cause the magnet to move and so will spoil your results. Before you start to take measurements, move some metal objects near to the magnetometer to see their effect.
  • Most importantly, you should become familiar with the daily variations of the Earth's magnetic field so that when a geomagnetic storm occurs you will be able to identify it. To do this you should take hourly readings on a few 'geomagnetically quiet' days. Once you have done this you can take magnetometer readings every day, or wait until a period of increased geomagnetic activity.
  • Record the position of the light beam on the scale (to the nearest 0.5cm) once or twice per hour. When you start to see large movements take readings more frequently, say every fifteen minutes - you may be observing the effects of a geomagnetic storm!
  • Switch the lamp on each time you take a reading - it is not necessary to leave it on all the time. However, it is important that you don't disturb the lamp when you do switch it on and off, so it is a good idea to use the plug socket switch on the wall to do this.
  • Record your data in your logbook, which will have three columns; 'Time', 'Position (cm)', and 'Comments'. When you start a new day underline the last recording of the previous day and enter the date on the next line. Sometimes you may observe the spot moving from side to side (oscillating), if this is the case take the position of the spot to be the centre of the range of motion and write 'O' in the third column. If there is a lightning storm nearby during an observation period, then note this down in the third column by writing 'L'.
  • If your set-up is moved, reposition the light spot at the 'null' position and note this in your logbook.


Last Updated ( Tuesday, 16 June 2009 )
 
< Prev